Providing proof of the results of your ad buys on social media networks is a must! This feature of the Facebook Advertising platform is so easy to use — it should be added to all of your accounts immediately! Learn how to use the Dynamic UTM Builder in your ads in a few easy steps to gain more insight into the traffic and conversions you’re getting from the Facebook family of apps.
If you are investing in Facebook advertising, this typically includes ads purchased on multiple platforms that they own or partner with Facebook to deliver the ads. Currently, when you’re placing ad buys on the network, you are buying them on Facebook, Instagram, WhatsApp, and the Audience Network if you’re using automatic placements. Understanding which app and placements are bringing you the most return on your investment can be tracked using a semi-new released automatic tracking method called Dynamic UTMs.
Understanding how UTMs help you report on ads is key to saving wasted ad dollars.
In a recent campaign we ran for the network we included dynamic UTMS in a unique way due to client restrictions. This hack allows me to see which ad and placement all in one is bringing me the most value for the objective set on the network. In the view below you can see the end result of some of the metrics filtered by an ad. This one is focused on time on site due to the fact that the client doesn’t have unified tracking within the application. The leads are recorded in a separate system so currently, it requires some manual calculation.
At the start of this campaign, we wanted to ensure that we could at least see that we were hitting a curious audience that would try the application out. Keeping a close eye on two types of creative used in Facebook and some specific placement tests allowed us to shut off ads that were getting far too much of the budget and was sending low-quality traffic. We focused on high bounce rates and low time on site, and the breakdown also shows our audiences used for the ad, used in the ad set name.
This is the end result of adding the Dynamic UTMS to the ads and creating some filters inside of Google Data Studio. Pretty neat right? Read below on how to use the tool built into Facebook ads to give you more information on your ads in Google Analytics.
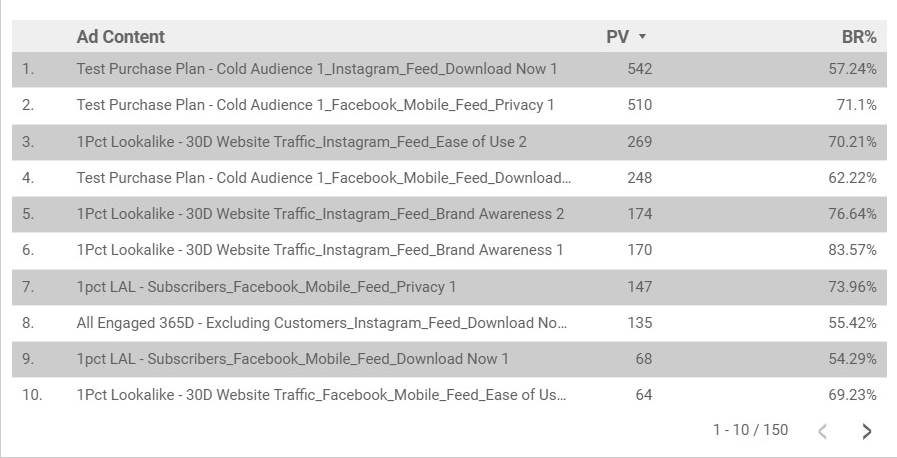
PV = Page Views BR = Bounce Rate %
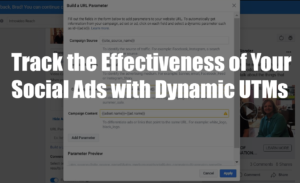
Add Dynamic UTMs to Your Ads
To add Dynamic UTMs to your ads you will need to place the dynamic values they provide into the preferred dimension. This UTM per their system documentation should get created on the fly so. As I stated earlier, this client had restrictions on how they wanted their UTMs constructed. I, however, need to know more since I’m the one directly optimizing the ads along with the assistance of Facebook’s algorithm. I took the values Facebook offers and placed them into one UTM value aka UTM_Content. See below for the available parameters you can use for your ads. These can technically be placed anywhere within the made-up or pre-defined fields.
However, you can use the UTMS how you want to segment your campaign and ads performance and reporting. For my configuration, we only wanted to know about the ads that were giving me the return I was looking to achieve. We chose the configuration this way so we could take all we needed for our Google Data Studio reports using the content as a filter.
“Use the UTMs how you want to segment your ads performance and reporting.”
utm_source=FB&utm_medium=CPC&utm_campaign={{campaign.name}}&utm_content={{adset.name}}{{placement}}{{ad.name}}
If you would like to learn how this works in detail, or just need someone to set this and the reporting for it up. Reach out and chat with us!